Data Asset Management
This section explains how to manage your datasets within our platform. Our data management system is structured in two layers: datasets and dataset versions. This hierarchical approach allows your datasets to evolve over time through modifications, cleaning processes, and enhancements, with each iteration being saved as a new dataset version.
When you upload data files, our platform automatically extracts their features. You'll then have the flexibility to specify how each feature should be used within your AI models by designating them as:
- Features (input variables)
- Targets (output variables)
- Metadata (descriptive information)
- Index fields (unique identifiers)
Additionally, you can identify privileged features and define specific value ranges to help monitor and mitigate potential biases in your AI systems.
In the following sections, details about adding datasets, dataset versions, etc. will be given. As a shortcut, you can also watch the video guide
Creating a New Data Asset
When you first access the Data Assets page without any existing data assets, you'll see an empty dashboard as shown below:
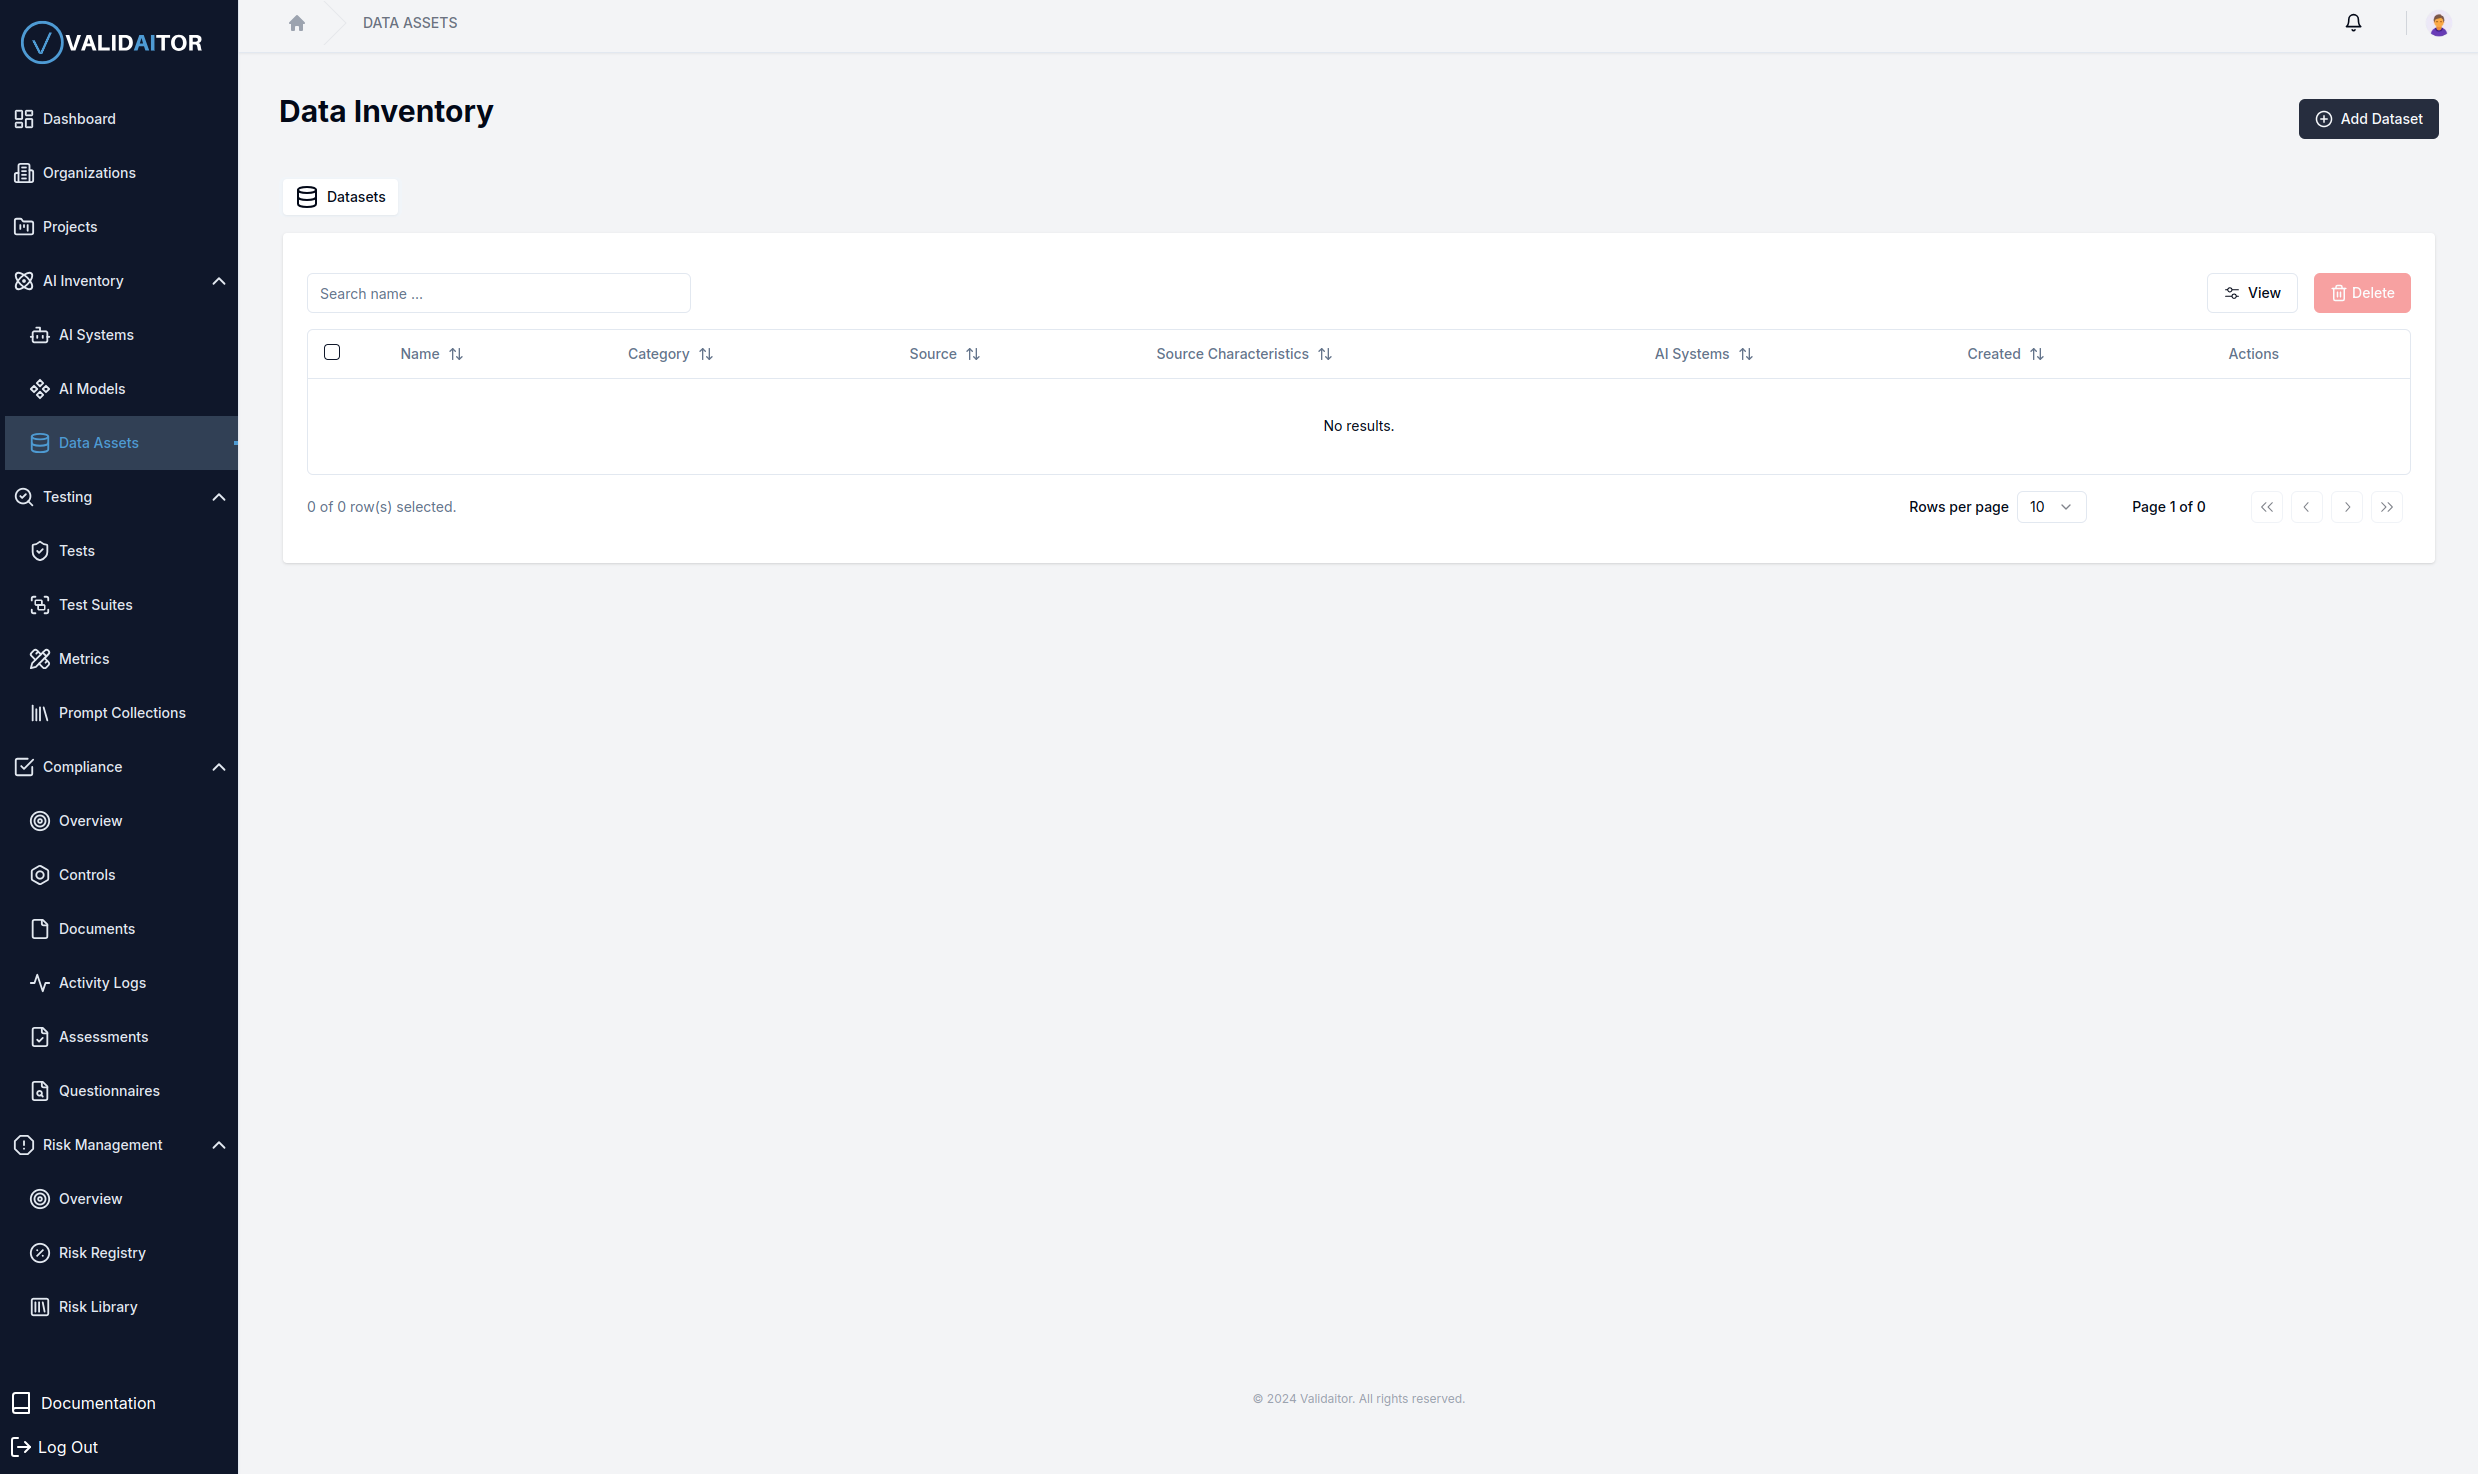
To begin creating your first data asset:
- Locate the
Add Datasetbutton in the top right corner of the page - Click this button to initiate the data asset creation process
Completing the Data Asset Form
After clicking the Create Dataset button, a sidebar panel will slide in from the right side of your screen:
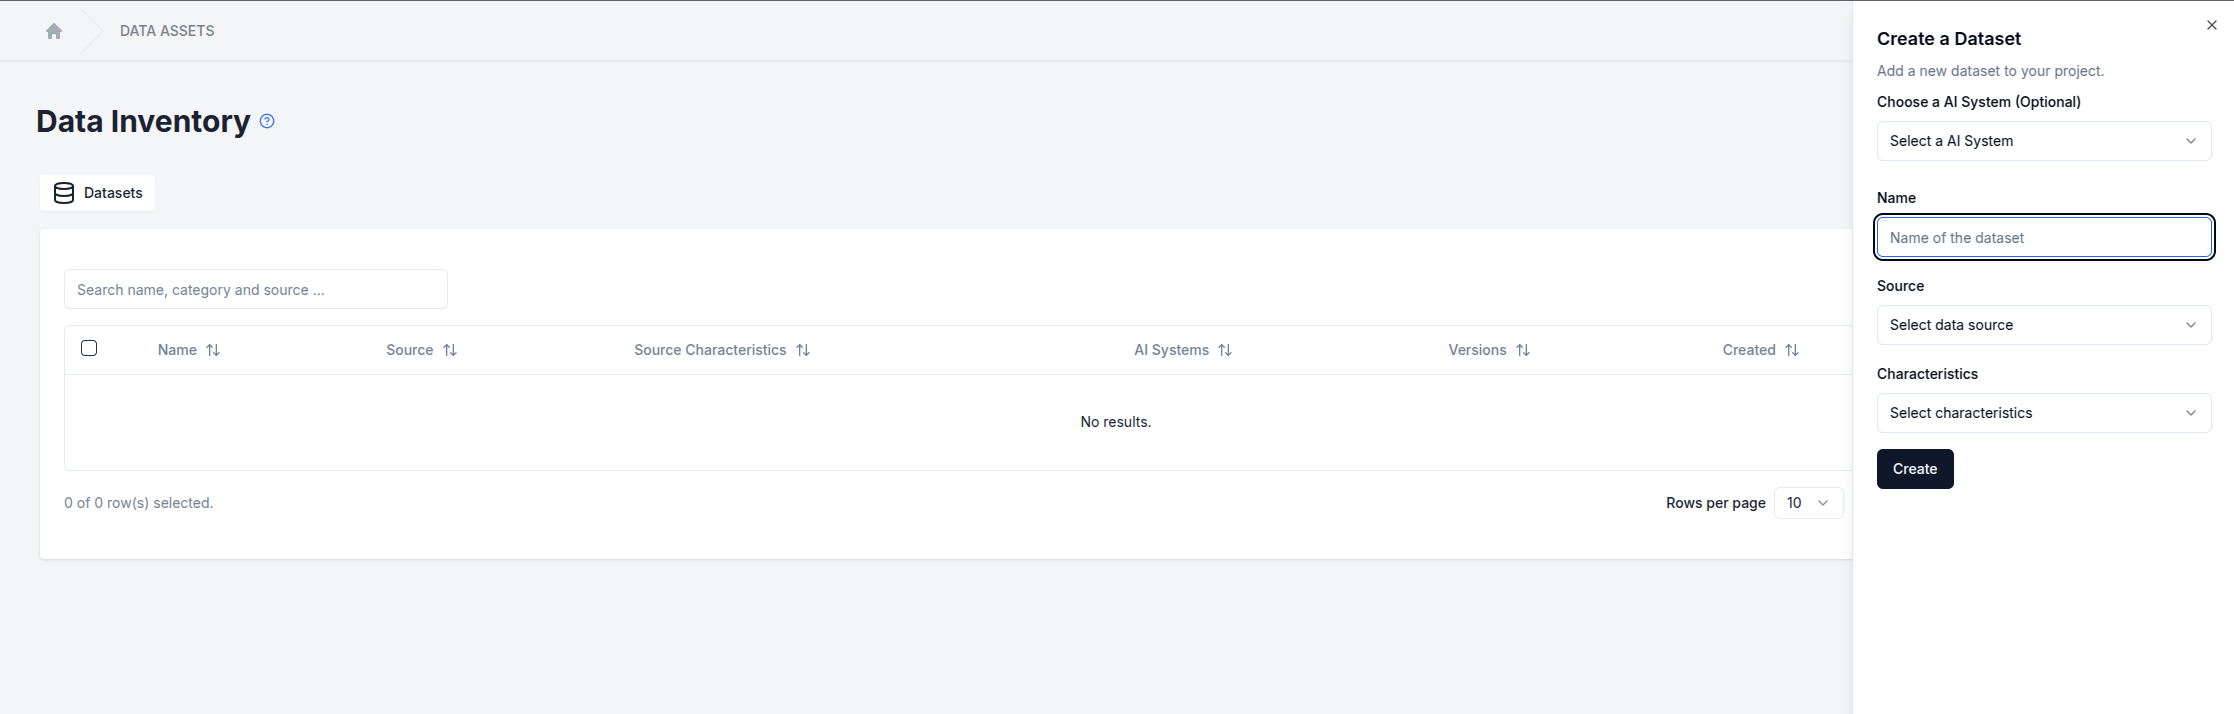
This form requires several key pieces of information:
- Name: A clear, descriptive identifier for your dataset
- Source: The origin of your data (e.g., customer database, sensor readings, survey responses)
- Characteristics: The nature and properties of your dataset
After completing all required fields, click the Create button to establish your new data asset. The system will then register your dataset and display it in the data assets table.
Navigating the Data Assets Table
Upon successful creation of your dataset, you'll be automatically redirected to the Data Assets page, which now displays your newly created asset:
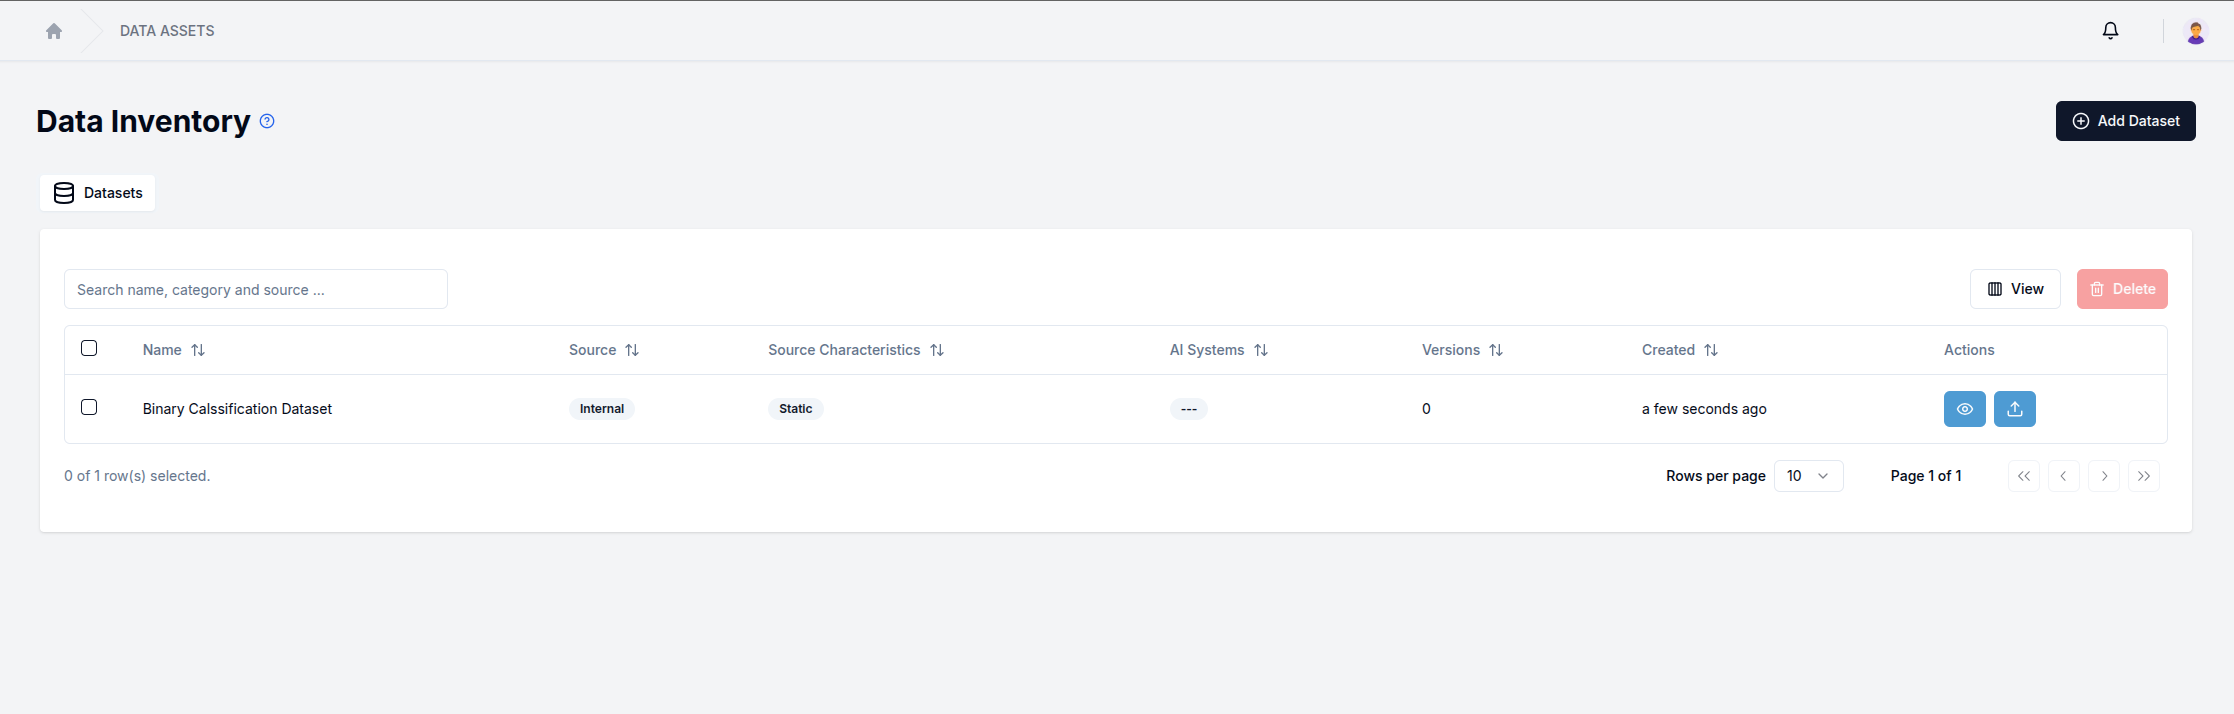
Each data asset entry in the table features two action icons on the far right:
- Eye icon: Clicking this icon navigates to the detailed view of the selected dataset
- Upload icon: Clicking this icon opens a dialog for uploading a new version of the dataset
Uploading a Dataset Version
After clicking the upload icon, a dialog will appear allowing you to upload a specific version of your dataset:

To complete the upload process:
- Select the appropriate category for your dataset
- Choose the file type (e.g., CSV, JSON, Excel)
- Select the file from your local system
- Click the upload button located at the bottom right of the dialog
Configuring Dataset Version Features
After successfully uploading a dataset version, the system will automatically extract its features, and a new dialog will appear:

In this dialog, you'll need to configure each detected feature by specifying:
- Functionality: How the feature will be used in your models (feature, target, metadata, or index)
- Value Type: The nature of the values (categorical, numerical, text, etc.)
- Data Type: The technical data type (integer, float, string, boolean, etc.)
Exploring the Dataset Detail Page
The dataset detail page provides comprehensive information about your data asset, organized in a user-friendly layout:

The top section contains information cards displaying key dataset attributes, while the main content area presents an overview of your dataset's characteristics and metrics.
For additional context on any field, hover your cursor over the information icons (ⓘ) to reveal helpful tooltips with explanations and guidance. This feature helps ensure you understand the purpose of each field and how to properly complete them in the future.
Remember that while some fields are mandatory, others are optional and can be edited at any time as your understanding of the dataset evolves.
Detailed Field Guidance
When creating or editing a data asset, use the following guidelines to complete each field effectively:
-
Name: Provide a descriptive name for the dataset to easily identify it within the AI system (e.g., "Customer Purchase Data 2023").
-
Category: Select the data category that best represents the dataset.
-
Source: Specify the origin of the data. This helps clarify data ownership and accessibility.
-
Characteristics: Describe the characteristics of the dataset. This helps define the nature of the data for usage considerations (e.g., "streamed real-time sensor data").
-
Demographics & Biases: Describe the demographics of data subjects represented in the dataset and note any known or potential biases. This can include age, gender, location, or other demographic indicators relevant to the dataset (e.g., "contains data primarily from users aged 18-35 in urban areas").
-
Data Rights: Specify any data rights or restrictions, such as personally identifiable information (PII) or copyright considerations, to ensure compliance with legal and ethical standards (e.g., "contains PII, restricted under GDPR").
-
Prior Handling: Describe any previous uses of the data and any conformity checks with privacy or security requirements that have been applied. This helps in understanding any past data processing (e.g., "data was previously anonymized and validated for security compliance").
-
Metadata: Provide additional details about data labeling, tagging, or any processes used to enhance the data quality (e.g., "labeled for sentiment analysis with accuracy checks in place").
-
Provenance: Document the origin or lineage of the data, explaining where it was sourced or how it was generated. This information is essential for traceability and data validation (e.g., "data collected from user surveys conducted in Q1 2023").
Managing Dataset Versions
Navigate to the Versions tab to view all uploaded versions of your dataset:
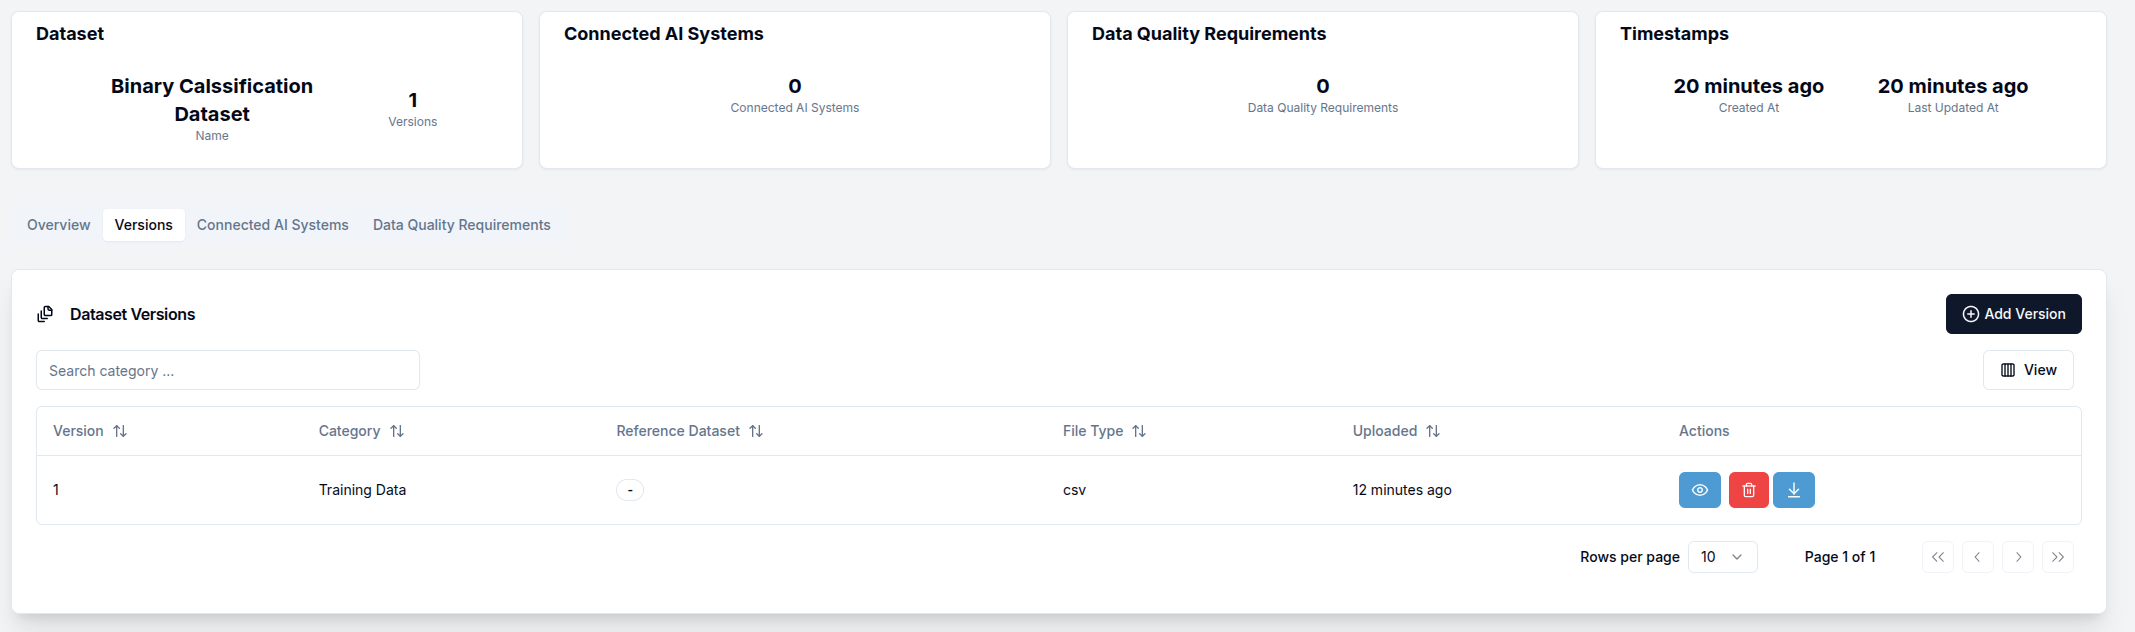
For each dataset version, you'll see a row in the table with three action icons on the far right:
- Eye icon: View detailed information about this specific dataset version
- Delete icon: Remove this version of the dataset
- Download icon: Download a copy of this dataset version to your local system
Dataset Version Detail Pages
When you click on the eye icon for a specific version, you'll access a detailed view with three primary tabs:
1. Overview Tab (Default View)
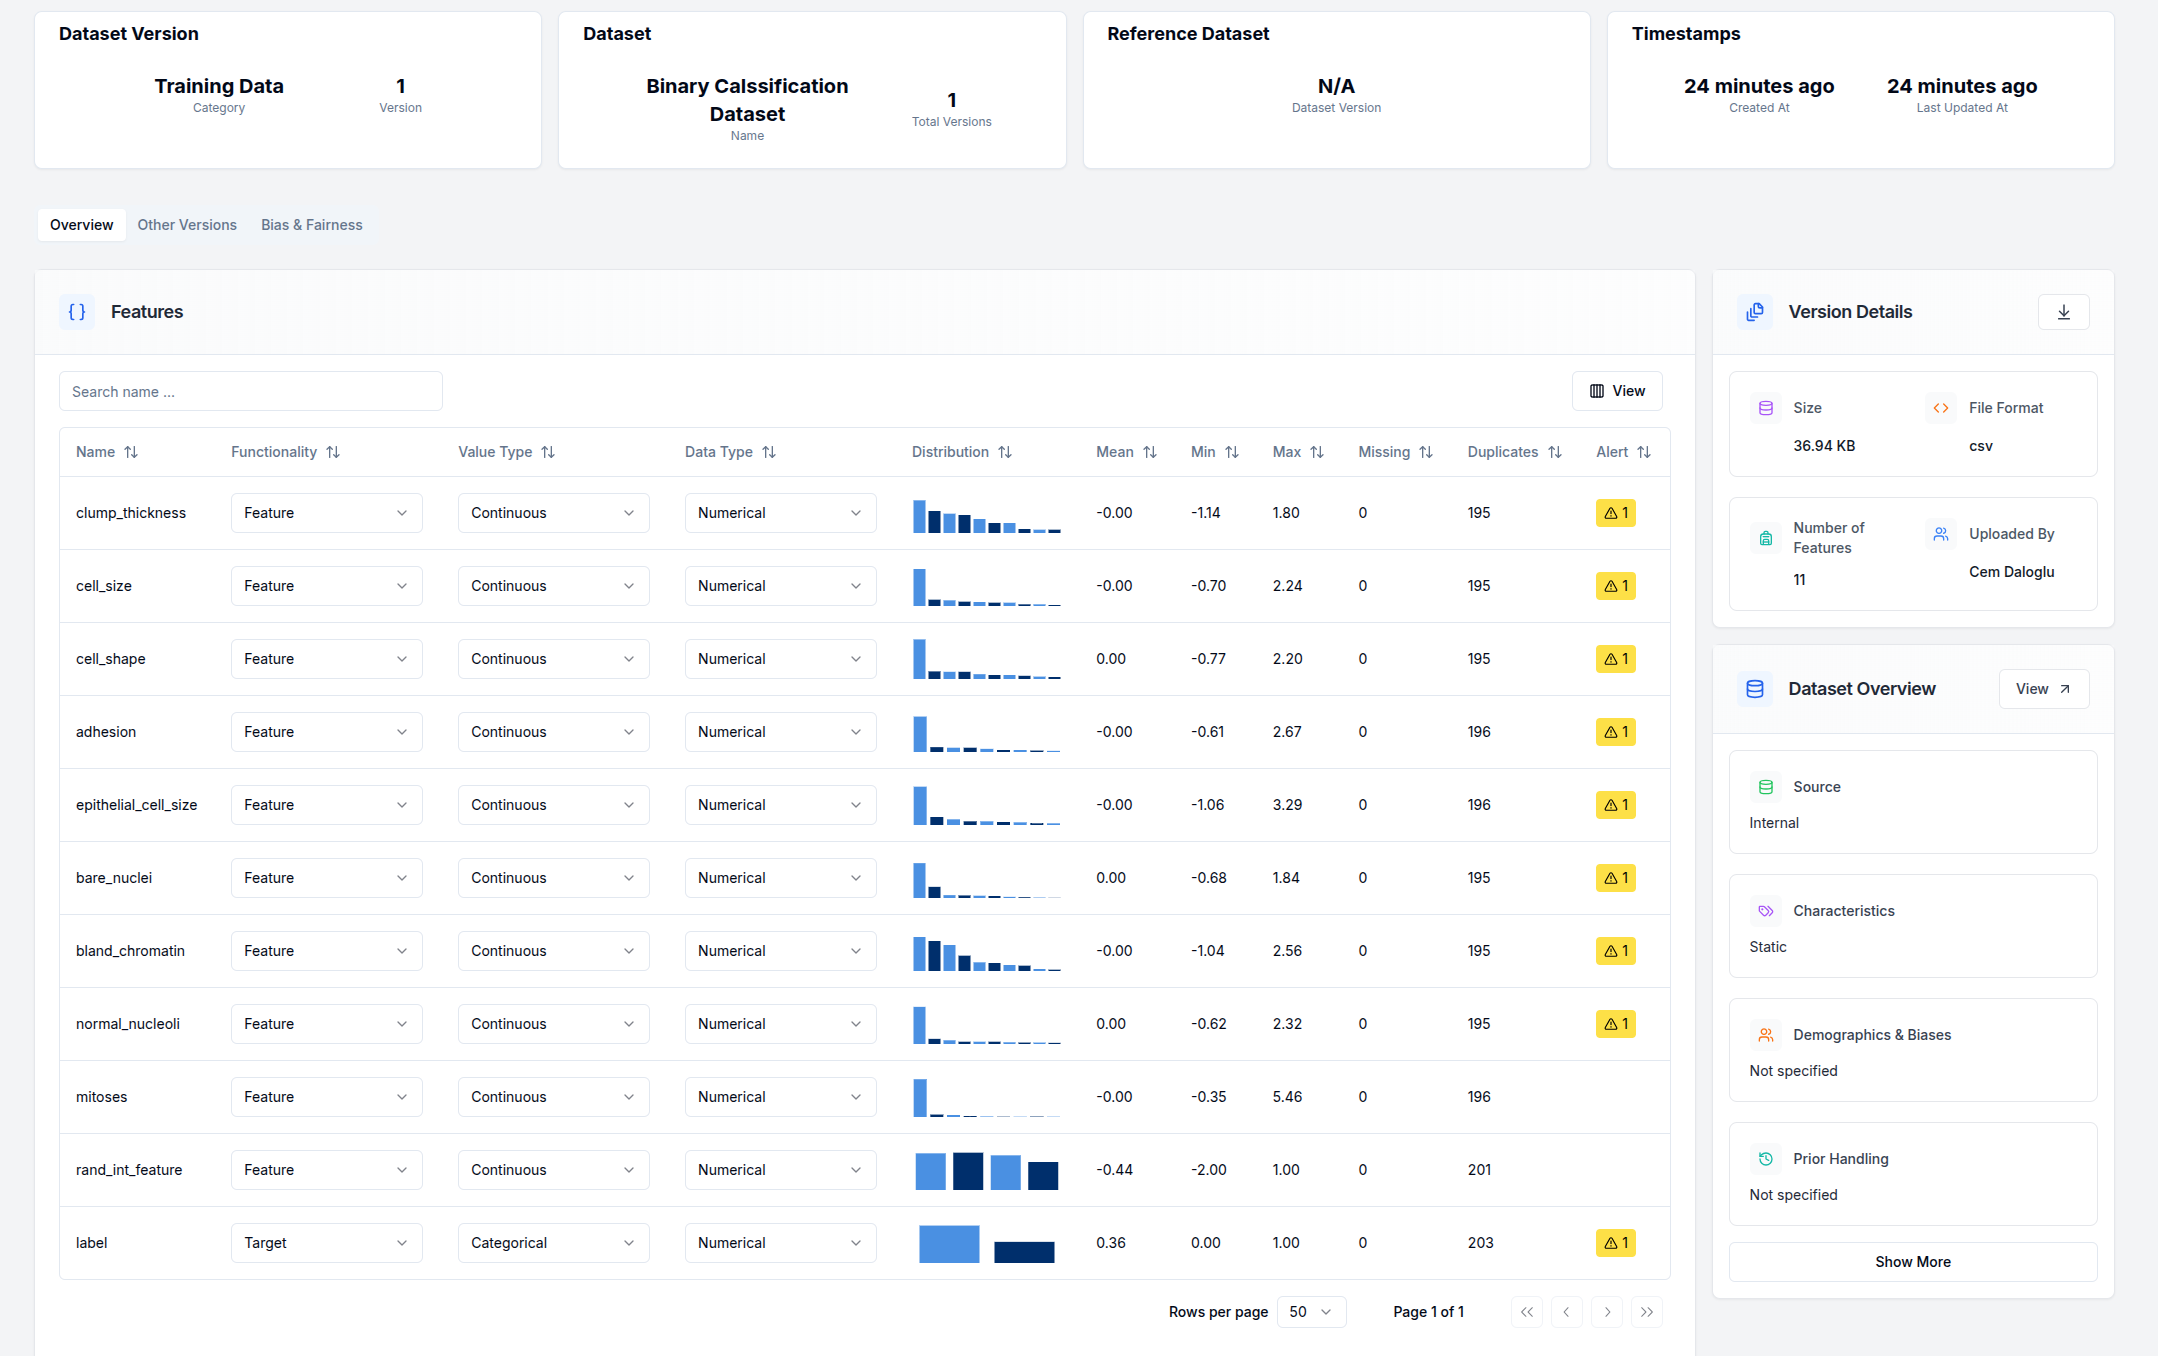
The Overview tab provides:
- Feature management capabilities, allowing you to modify how features are classified and used
- Visual distributions of your data features through appropriate charts based on data types
- Key metrics summarizing dataset characteristics
- Automated alerts highlighting potential issues, particularly correlations between features that might impact model performance
2. Bias & Fairness Tab
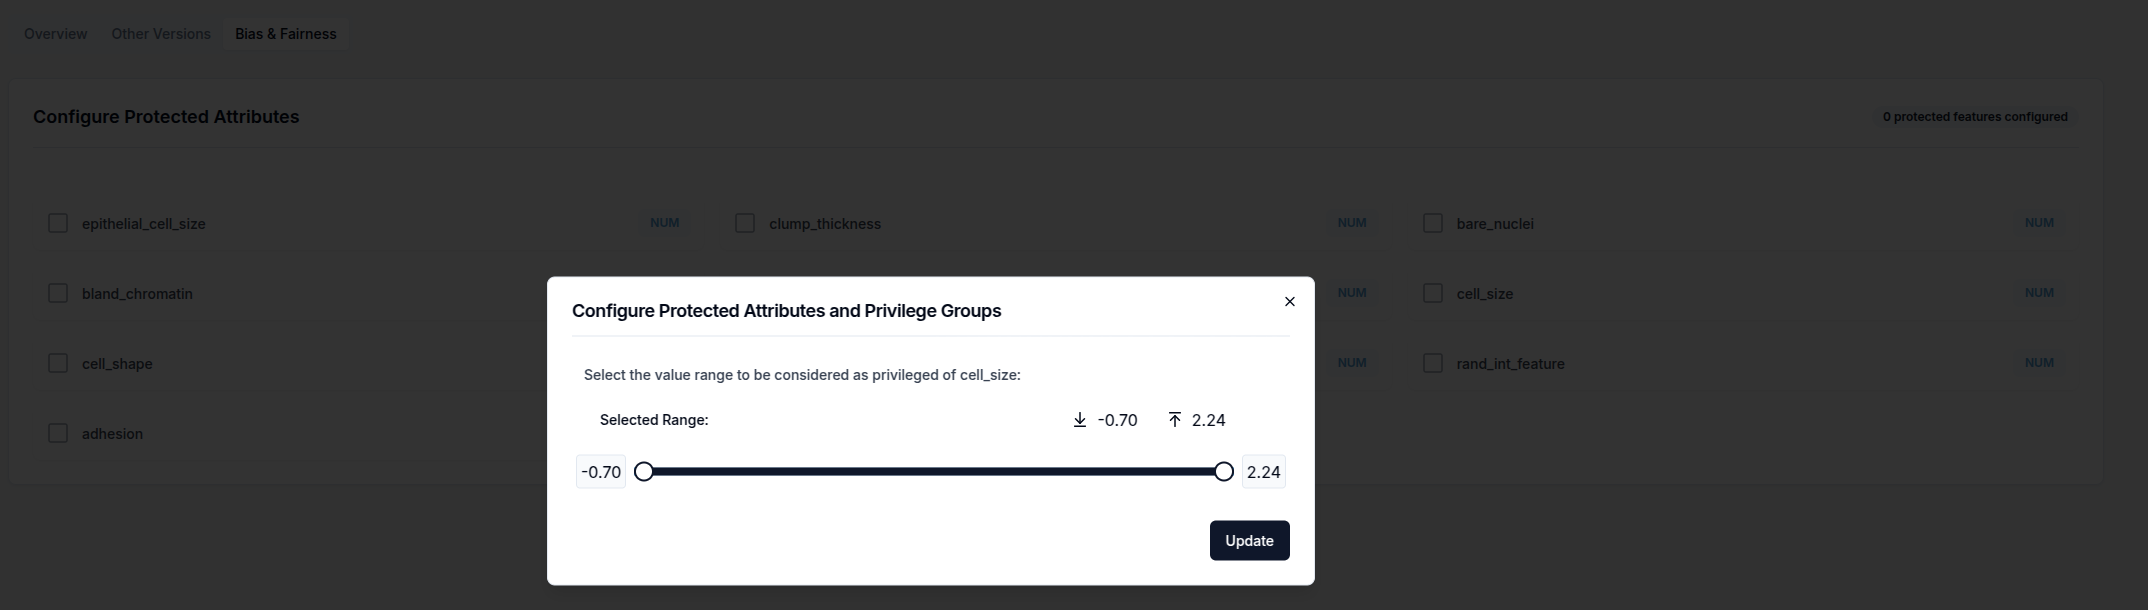
This tab is essential for responsible AI development and allows you to:
- View all features in your dataset (excluding target variables)
- Click on any feature name to open a configuration dialog
- Define value ranges that should be considered "privileged" for bias detection
- Set parameters for fairness monitoring in models built using this dataset
By properly configuring these settings, you can proactively identify and address potential biases before they manifest in deployed AI systems.